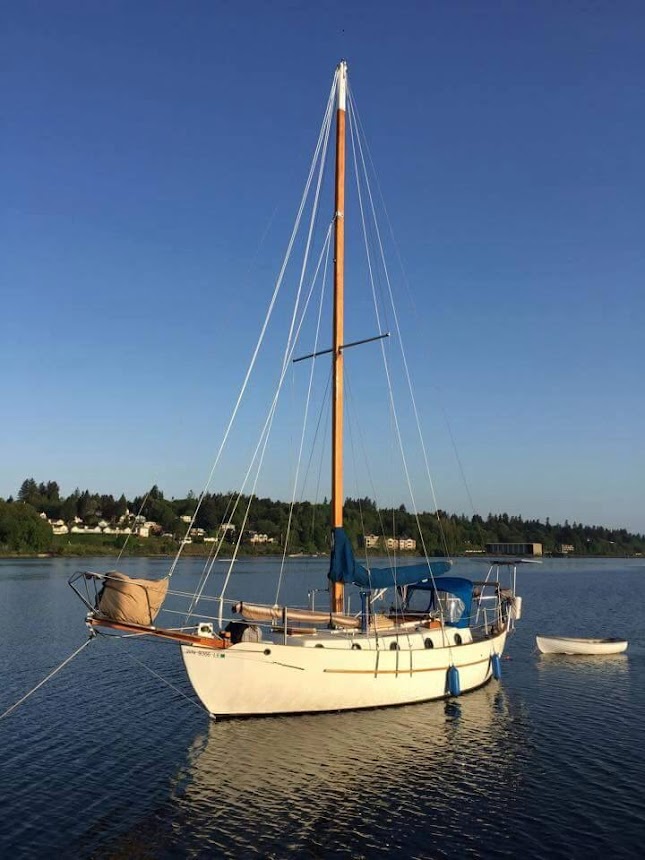
Our Boat

Our Boat
Westsail 32, s/v Harbinger

Friday, September 18, 2015

Back in a Marina


And we are back in a marina. The good parts of being in one place for a long time, winter, is having electricity, propane, diesel, showers, water, laundry, mailbox, and groceries available at our fingertips. We are actually spoiled with conveniences, yet not spoiled with enrichment of being out there.

When we are out there on the hook we conserve everything and yet enjoy it all. We know the tide and weather, like the back of our hands. We experience the storms. We experience the gentle sway of calm days. And we experience new places.

The lack of exploring new places, seeing the same harbor everyday, grows inside us an unsettling desire to take off. I believe exploration is growth which makes life very worth living every second. There are some days we don't even take our cameras, we just want to experience it all.

Patience my dear, as Michael would tell me, we will be back on the hook again.


Friday, January 2, 2015

A New Year Aboard Harbinger 2015

It has been about a year since I posted and haven't really written anything in last 6 months.

We started cruising around the Puget Sound in spring of 2014, then cut the dock lines on June 1st headed to the San Juan Island. The Islands were beautiful and we did not want to come back to our home port. During our summer cruise we learned so much and saw some really neat scenery, it was truly invaluable. We came back to the docks on October 1st and have been in dry dock ever since.

Dry dock is certainly dry, yet it is a royal pain. We work all the time, either on the boat or making money, and surely miss the water. There is a ginormous tarp over our boat and it provides privacy, warmth, and more dryness. The projects are so numerous aboard I believe we have gotten lost, but the boat is looking better and better every day.

Soon we will haul back in and stay at the marina for a while as we plan our next cruising adventure.

Sunday, January 5, 2014

Like us on Facebook!

I haven't posted in a while because we are transitioning our blogs and life. We left the marina traveled a lot in the boat in 2014. Endured a tortuous winter 2014 on the hard while earning a living outside the boat to refill the kitty. Then we started 2015 finishing up numerous projects aboard and more traveling. Now as we approach the end of 2015 our list of projects continue, yet we feel closer to our goal to take off in our boat and sail the world. We hope to make posts helpful in DIY projects, travels, and homemade recipes.

Like us on Facebook! Enjoy!

Sunday, November 17, 2013

Coffee On the Boat

Coffee is a part of our life, every morning.

In preparation for living aboard the boat, we knew we did not want to take our electric coffee pot on board. So we started using the coffee press a couple years ago, and we researched and trialed different ones. 

Our initial coffee press had a glass carafe encased in stainless frame. We took this out on our trailer sailboat several times and were very happy with our pressed coffee. In fact, we were so happy with the resulting coffee from the pressed coffee we started using it more and more, instead of our electric coffee pot.

The bad parts about the glass carafe, as we found, it would not keep the coffee warm for very long. And on a boat which rocks and rolls the glass was too fragile to keep safe. So we looked into other options of coffee press. We finally settled on the Frieling all stainless steel insulated press. It holds up to 32 ounces, we can get 4 cups of coffee out of it. It keeps the coffee warm for at least a couple hours. On a typical morning, we will make two of these pots. Also, it can sit on top of the wood stove to keep it warm, although we typically boil water in our tea pot not the press.

In our downsize, we got rid of our electric grinder, now we are looking for a good substitute. I've been using the mortar and pedastle, but it's a lot of work. In time, we may purchase a grain miller that can mill grains and grind coffee, a multifunction gadget would be ideal, less to store on a boat.


Wednesday, November 13, 2013

Natural Air Freshners on our Wood Stove

Our wood stove has been running all day long with temps outside hanging around 40 degrees. With that said, I decided to try a natural air freshner. I've read some online about different herbs being placed in water and slowly heated to release their aromatic properties.

I tried cinnamon and cloves, this lasted a couple days on top of the stove. It smelled nice.

I tried the lavender I picked this summer. It lasted a day. At first it was very aromatic, then it just stopped.

I plan to try out the rosemary from our plant growing in our cockpit, and in time I'll have all sorts of herbs to freshen the air in our musty old boat!


Tuesday, November 12, 2013

My New Purse and Wallet Combined, a Lanyard, Downsizing Continues . . .

I'm guessing I was a teenager when I first started carrying a purse with a wallet. Now, 30 years later in my forties, I gave up my purse & wallet carrying ways and downsized to a lanyard.

It cracks me up to think of the hundreds of dollars, or more, I spent on purses and wallets over the past 30 years. And now to only have a lanyard with a key chain, it holds everything I need (bankcard, marina gate key-card, license, library card, museum card, boat insurance card, co-op card, and a grocery rewards card), it is the exact opposite of social expectations I was used to.

In our society, women are expected to carry a purse & wallet, and men carry a wallet. This is just how it is. Retailers advertise this in various repetitive ways. When I was a shopper I used to go to the local department store and drool over the new line of purses with matching wallets. It was like these were toys we had to have to be cool and look good. The logo was everything, and if it began with certain letters that meant you were socially higher and probably more economically stable and richer than others. Ironically, as I experienced myself and watched others do, the people who had these purses with logos where not economically stable or socially higher or richer. We got stuck in a trap, suckered into over-spending to show a certain fake facade to others. Billions of us did it, and we made some people very rich.

I sort of climbed this mountain throughout the past 30 years, lets call it Mt. Social Norms. I started at the bottom not exactly sure if I was gonna make it to the top, because after all only certain people made it there and had the nice things. I got to the foothills of this mountain it was foggy, I got lost and confused, incurred some debt. I kept going higher and higher, the bills stacked up, then altitude got me and I passed out. When I awoke there were billions of others laying next to me, and only a few made it to the top of Mt. Social Norms. Those that made it came down to us and told us don't bother trying to get up there because we weren't the right kind of person, and they already took their stake in it and to just go back down to the bottom. Upset at this we stayed there in that high altitude area, determined to prove them wrong, every now and then passing out dazed and confused from those high altitudes. In time, some just left, but others they stayed and are still trying.

For me, I got too sick of that mountain and headed down fast. And I never looked back because it felt so good to be away from it. They can have that stinking mountain because I prefer to be a happy outcast, rather than a miserable climber pushed down by society.

Now when I leave the boat or car I sometimes want to reach for my purse, it is habit; or when I leave some place I am looking for my purse. Then I look down and find relief because it is hanging on my neck, phew! I cannot believe how easy it is to carry only a few items of importance and have them hanging on your neck. Maybe it's not the most expensive, or prettiest, or socially acceptable, but it works for me.


Tuesday, October 15, 2013

Homemade Shampoo

I decided to use this concoction for my hair, may sound weird, but it works. When I was a child I've had this dandruff problem. I used the special anti-dandruff shampoos, some work, some don't. Now I've used this easy and cheap concoction for the past month and it has reduced the dandruff and makes my hair full and soft.

Here is what I do a couple times a week, either at sink or in shower:

Wet hair, dissolve 1/2 cup baking soda in warm water, pour on hair, rub in. This will exfoliate the scalp and hair follicles. Next I pour 1/2 cup vinegar over my hair and let it fizz. Scrub and massage in, I let it sit for some time, say 2-5 minutes. Then rinse.

My hair is soft at root and sometimes a little dry at ends, for not using commercial shampoo and only using this concoction it cleans my hair very good and my dandruff is under control. Here is picture of my scalp. Our son, we just noticed, has some dandruff on top of his scalp. I'll start posting on him to show the progress of using the baking soda and vinegar concoction to reduce dandruff.


Monday, October 14, 2013

Homemade Dish Soap


Here is my next project, homemade dish soap. For obvious reasons, we do not have space for dish washer, therefore, we have to wash dishes by hand. I am super interested in making all these detergents, soaps, body care, tooth care, and anything else we use daily, from items I can easily obtain and without a bunch of harsh chemicals and without breaking our pocketbook. With this soap I used all ingredients I already have: grated soap, vinegar, water, and tea tree oil.

2 cups boiling water
1/4 cup grated soap
1 tbsp vinegar
1 tsp tea tree oil

I boiled water, added grated soap let it dissolve, added vinegar, let cool then add teat tree oil. After it cooled I then poured into a clean jar. My first batch is pictured below. I placed it in this old pickle jar and cut a hole in the lid, then stuck a pump in it. 

So far, the soap thickened in a couple hours after cooled. I had to strain some of the grated soap that did not dissolve, so it would not clog the pump. I've used this for dishes and noticed it does not bubble up like commercial products, but it cuts the grease very good, which for us without a water heater is a nice thing. Sometimes when we wash a greasy pot or pan in cold water it just swishes the grease around. I will keep testing and tweaking, and update.


Wednesday, September 25, 2013

Organizing is Tricky Business

Since we downsized from a 4 bedroom, 2 bath, 2000 sq ft home, we have worked hard to find a spot for everything on our 32 ft boat. For the most part we have done so, there are only 4 file box sized containers and some misc camping/tool stuff stored in the trunk of our car.

The hardest things to organize right now on our boat, after 4 months of living on this boat, are the galley (food and pots/pans), our wet locker (jackets, boots, rain gear), and our linens (towels and bedding). 

1. Our unorganized wet locker

2. Our linen,piled on top of hanging locker/drawer area


3. Our not-user-friendly galley, sporting the water hose in sink while water tank is out of commission 


Here are some areas we have made progress with organizing! Yahoo!

1. Clothes

We made shelves in our forward locker. It is very deep and was used with a rod for hanging clothes, but there was so much wasted space in the back of it we decided to put in the shelves. Plus, we really don't have a need to hang clothes any more, most of our clothes are casual and can be rolled up to fit in tight spaces. Right now, we each have some drawers and a shelf for our clothes, and it works pretty good. I managed this week to get all our winter and summer clothes to fit together in our allotted spaces for clothes.


2. Fruit and veges and a pantry

We have a hanging basket for our fruit now and a net for other foods. Both work very good. But our can goods and dry goods are stored in a couple places right now with no organization. Pretty much every time we reach for a can we knock over 3-4 other ones in the process and then we cannot find the can we want, ugh!

Our net, I call it the pantry


Our new/old fruit basket (got it free and fixed it with rope)


There are many other items around the boat we have stowed or put up, which works for now, but we aren't sure if its gonna keep working. Things we stowed just to get out of the way: electronics, office supplies, games, books, sewing stuff, material for projects, tools, projects in and out of boat with all the stuff to fix them, extra blankets, important papers, toys, DVDs, CDs, and this list just keeps going! 

Here is our future plan: empty our car, keep organizing, get rid of some more stuff, keep only what we need, and stow stuff without it getting moldy or wet (which means we gotta fix the leaks!).


Saturday, September 21, 2013

Homeschool Lesson 1: Fishing

This week hubby took our son out Salmon fishing and he loved it. They didn't catch a Salmon, but the experience of it was worth every moment. There is a saying:
Give a man a fish and you feed him for a day. Teach a man to fish and you feed him for a lifetime.

Its meaning, it is more worthwhile to teach someone to do something, than to do something for them. This is our motto. We plan to teach our son to be able to survive in life on his own, for we know mommy and daddy will not be around all the time to do this for him, and we want him to learn how to survive on his own.
We also plan to teach him the proper english and mathematics he will need to know for educational purposes. However, we will not adhere to a schedule pushed on us by society, rather we will focus on what is at hand and the rest will fall into place. To some at his age he may seem smart, and to others not, but to us he is where he should be - learning at a pace without societies influences of statistics, norms, and consumerism. He will be able to read, write, add, and subtract - like all the rest of his peers; and also be able to fish, sail, fix a motor, have good manners, cook, enjoy life, and so on . . .
We currently allow interaction with peers his age in certain arenas. He is very talkative and friendly with other children his age. At times, he is aloof with other children because they are raised within the norms of society, and he is not. There are places he goes and some children are extremely friendly with him and do not pass judgment on his way of life. And then there are the others, who think he is weird (because he is wearing his life jacket outside the marina or loving his toy boat) and will either shy away from him or ridicule him for being different. He will have to learn, as we all did, how to deal with all kinds of people, the good and the bad.
For now we focus on the Salmon run, to catch one of those big yummy fish, so we can feed ourselves for a while. And if we learn other things through this adventure, like a new song or how many seals we see as we row/sail out to the Salmon spot, then it is an added bonus.

Thursday, September 19, 2013

Homemade Detergent

I have never made so many homemade products before. This homemade detergent recipe I researched several and tweaked to my liking and it works great, easy to make, cleans the clothes good, hypoallergenic, and cheap!

Here are the ingredients: (I found them at local store, but some stores don't carry all what you'll need so some people mentioned they went to a hardware store to get the washing soda and Borax), I also make 1 gallon at a time because my stock pot isn't large and I don't have a lot of room.

1/2 cup washing soda (1.6lbs cost $7)
1/2 - 1 cup Borax (4lbs cost $5)
1/2 bar soap grated (I used an herbal bath soap bar on sale for a $1 at local co-op)
1 gallon of water
Optional : 10-20 drops lavender or other essential oil (cost $6 for whole bottle)

A total cost of $13 for these ingredients.

Place grated soap and1/2 gallon water in stock pot on medium to high heat and stir.  


When grated soap is dissolved add Borax and washing soda, bring to boil, keep stirring. 


For some people it coagulates, mine just had suds on edges of pot and looked pretty liquidy, but I boiled it and figured that was good, so I took it off the heat, let cool.


Once cooled add the remaining water in my gallon jug, about 1/2 gallon was left. I stirred well and noticed the solution got thicker, the first time it almost looked like half done jello, this time it's more like liquid.


I then added a 10 drops essential oil, the soap I used had a green earthy smell so I thought lavender would smell good.


I got my funnel and poured it into the gallon jug. 


Days later the first solution looked like half done jello, but it poured easy and washes the clothes well (we use front load washers at the marina). I use a small plastic cup to pour a pre-measured amount into washer, it measures about 1/2 cup.

Happy washing!


My first batch I made in late July is now depleted, the gallon lasted 2 months. I typically do 3-4 front loads of laundry each week, I estimate that I got 28 loads from this gallon. 

Today, September 18th,  I plan to make two gallons, and use remainder of grated bar of soap. The box of borax is 3/4 full, even after using some for another cleaner, have lots more to go. The laundry soda is 3/4 full too. I am planning to experiment this time with each batch, adding more borax and some essential oils. Trial and error is the spice in life!


Tuesday, September 17, 2013

Natural fruit fly killing concoction


When we buy fruits and veges we sometimes get inundated with these little flies. I believe the last culprit was a couple ears of corn we had lying around for several days. We really meant to eat them, but time and other things got in the way, then they spoiled. We had the largest colony of fruit flies I ever did see. And these things fly every where, up your nose, in your ear, into our Natures Head, all over.

One night we were enjoying a glass of red wine. And I had to swat these pesky flies away, and finally they found their way into my wine glass and drowned. This sparked an idea for hubby. 

The next day he poured a couple tablespoons of wine, a couple tablespoons of rice vinegar, and  a tablespoon of balsamic vinegar, all into a small glass jar, with no lid.

Voila, we had a fly trap, without any sticky mess (we already tried the sticky fly paper and it just stuck every where). There are too many of those dead flies to count at the bottom of the jar, yahoo!!

I also spray from now on all incoming fruits and veges with vinegar, just in case.


The jar with hubby's fly killing concoction.


Dead flies in the jar.


Marine and Wildlife around our Marina

We've got some wildlife hanging about the marina. I will try to get a photo of each of them.
It's the neatest thing to see them living around the water. The seals are to quick for me right now, but in time I will catch them by camera and post.

All kinds of birds:

Blue heron


Seagulls, eating starfish, Geoduck under the ground you can't see but they squirt water out at low tide


Some Marine life:

Crabs, good for eating, and entertaining our son who loves to take the claws and play with them for hours


Jellyfish


This Jellyfish has eyes, so weird!


Fish, Barnacles, Starfish-stuck to pylon, and mussels 


Hubby and son left early this morning out fishing today, they are looking for some Salmon. It is Salmon season here in the pacific northwest, and Crab season just ended. Hopefully, I'll have more pictures of fish we caught!


Friday, September 6, 2013

Tides

At the very south of the Puget Sound, where we are, we get a nice change in tides. Our high tide reaches over 15ft around the full and new moon phases; and the low tides reach a -1ft. During high tides we get the weirdest low frequency waves, it's like a tiny tidal bore. Once they start all the boats get to rock n roll, back n forth. Such an interesting event to see.

Anyhow, our dock moves up and down with the tides. I have never before experienced living so close to the water and having to pay attention to the tides. A high tide is important for us for a few reasons:

The first reason is to get out of the marina in the boat. The inlet is very shallow and there is a sand bar on either side near the larger opening towards the sound. So it can be tricky to get out at low tide, you have to stay within the green and red buoy or you will run aground for sure. Most travel about when the tides are high, or near high tide. 

A sailboat stuck on the sand bar. (Maybe this sailor did not read the charts or have depth sounder? In any case, they had to wait for the high tide later that evening, then floated away.)


The second reason is to get across the gangway. When the tides are low it is a difficult task to walk up, or down, especially when you are carrying or wheeling some heavy items. At times, bringing heavy things down the gangway it looks like a steep hillside you could slide down and get to the end pretty fast, but your landing pad is narrow, and if you miss it you'll end up in the water. We often joke about doing this, one day we may try it, with an empty wheelbarrow, of course!

High tide, an easy walk across gangway.


Low tide, a tough trek up the gangway.


Thursday, August 29, 2013

Our Love Story and the Anniversary Tattoos

Well we met when we were in 5th grade, we were around 10 years old.

We both remember what we were doing, swimming in a pool. He lived in a house with a large pool, my mom took me and my sister to his house for a visit. His mom made snacks, a salsa poured over cream cheese served with tortilla chips, which we eat to this day.

Our families spent the next 4 years having fun hanging out. Then his family moved far away up north and we didn't see each other until after our high school graduation when he came back to visit his relatives. We hung out and played, had a good time. Then he left back to home, we didn't romance each other. I had just broken up with a boyfriend and was young and dumb.

Another 5 years went by until we saw each other again, at my sister's wedding in Las Vegas. Oh boy he was a super hottie, and I was too shy to say anything. We both had children by this time, and had already ended a relationship with the parents to our children. But we just talked, he played with my daughter, then he left. I didn't talk to him anymore after that, and wish I would have done something more that night.

Ten years later, we were in our early 30s, he sends me an email. He found me on the internet and was wondering how I was doing. I was SO excited, I responded immediately. We talked online for a couple months, video chatted for a couple more months, then met for a weekend (he was a gentleman, nothing happened, we just hung out and had fun). We parted ways at the end of the weekend, kissed each other and I knew he was the one. I cried all the way home and couldn't wait to see him again. 

Well shortly after this weekend I flew up to him, we made plans, then he flew to me. And I moved in with him, we started our lives together. Got married and had our son, now 7 years have gone by.

On our 4th wedding anniversary, at 40 years old, we decided to ditch our wedding rings and get a tattoo, my first ever tattoo. This was a step towards our plan to sail into a life with less material things and more meaningful adventures. We designed it together, a heart with infinity sign, to signify our love forever.


Tuesday, August 27, 2013

Clean and Dry the Bilge, aka the Black Hole

Ok, hubby read in a book about fixing boats that we need to clean, dry, and paint our bilge to get rid of blisters located on hull of our boat, near the aft.

So one of my duties, as first mate and occasional admiral, is to clean this old grimy, oil, dirt, water filled thing down deep in the boat. I can barely reach this section of our boat. I know it's there because I regularly fill the water tank and see it, but it's like that black hole where no one dares to go, except me.

A picture of the black hole.


I started inspecting this black hole, and gripped a lot! Initially, I demanded I need this, and that, even before I start this sort of project, hubby looked at me like she'll get over it. I devised a plan, learn how to do this, ask around, stall some, and then do it when I'm done complaining. Hubby knows me well.

So for the past week I have gathered some of those absorbent pads, for oil spills, and placed a few down there in the black hole. I used our stick to grab the dock, it extends, to get it down there. When I pulled the first one out it was black, ewwww, I was done! Hubby, promptly sprayed simple green around and inspected, then told me its not that bad.

I read some more about cleaning the bilge and the miracle chemicals that say they will do it without any hard work. But I was not born yesterday, and there is no miracle stuff that's gonna clean out this grimy stuff, it's been there for at least a decade. I could barely see our bilge pump, it was black like the water, hence the black hole!

For the past week, I open the hatch and stuff more absorbent pads in the black hole. I believe there were about 6 pads down there today when I decided to get them out because hubby got more from the marina, they give them to us for free, he's gotta keep me on task.

After pulling the pads out I scrubbed the pump and actually saw its colors, then I pulled out a zip tie and old plastic bag. I could hear things swishing around down there, so who knows what else lurks there. I did manage to figure out a neato way to clean the grim using the pad and the stick. I wrapped the stick hook with the pad, then placed a rubber band on it so it won't come loose while I scrub, this worked really well at releasing the grim.

I used up all the pads, now I've got to get more. We flushed the hole with some water and ran the pump, now we can actually see there is more than just black down there. Oh an we pulled out our sensor that was disconnected, it's supposed to be a safety feature that turns the pump on when the water level gets to high.  It was so old n grimy who knows when the last time it worked, now we've got to get a new one.

And while down there in the black hole, guess what? I noticed a leak of water from the engine room. The other day we had to squeeze the motor battery into a compartment near the plumbing and I think we hit a hose cause water started to spray out from a bulging hose. We tightened them down, but they are still leaking. We may have to replace all the hoses sooner than later, as we had planned to get this project done later, time will tell if a quick fix will work.

Here is picture after I've cleaned out quite a lot, but as you can see there is a lot more to go. And the leak just keeps going, darn hose!


Sunday, August 25, 2013

The Many Uses of Freezer Paper

Me and hubby use freezer paper all the time for our DIY projects around the boat.

I use it to make the vbirth and settes templates for foam, to hot glue my hoops for port windows, and for any other sewing project outlines I need.

Hubby uses it to paint on, and when he does fiberglass or epoxies stuff.

We are on our second roll since we bought the boat, and wow these rolls last a while.

Buy some freezer paper if you are DIY painting or sewing, you will love it!


Sewing Project for Dock Neighbor


We are learning the sailor lifestyle and how to help neighbors out. Here at the marina, things are different, than in the city. Our neighbor gives us rides and goodies, like fresh crab, and we help him with mechanical and canvas stuff. The friendliness at the marina is addicting, many people offer to help and always say Hi or open the gate door while on gangway (a bridge to the gate from the dock).

Our neighbor needed a companionway cover, we talked about it and I offered to make it for him. He got the material and snaps, then I sewed it up. I took the measurements to make sure we had enough material, we only needed 1 yard. We also discussed which fasteners to use, the color thread, and where to secure snaps to companionway.

After all that, I used my freezer paper to draw a diagram of what the cover should look like size wise and with the lip at top, cut out for lock in the middle, and length/sides of cover. 

I made two pieces of material. The first piece was quite difficult to measure and sew for the lip. I used vinyl under the canvas to help it lay and grip around the lip. The second piece was easy, I just cut and sewed based on the trapezoid shape. I used a piece of Dacron at the top seam of the bottom piece, so I could leave a small opening for the lock, between top n bottom pieces. 


This picture was taken before I finished attaching the two pieces, (you can see the white Dacron showing between top n bottom where lock will be). I was measuring where to fix top to bottom. I like to staple the pieces together and keep trying them out to make sure it fits. Right before I did this picture I had to adjust the top piece over the lip and place a seam so it would lay flatter over the lip and more even, this was tricky. I'm always adjusting and readjusting, then measuring and remeasuring.

The finished product looks nice, covers the companionway, and we are all good neighbors!


Saturday, August 24, 2013

Sewing, Making Cushions Part II

Ok, here is my part II to making cushions. The first part was how I went about getting all my supplies to make the cushions and somewhat how I did it. Here I hope to show more in depth how I made the cushions and the final product. I have since changed our sette cushions, due to fabric's inability to stay clean, so pick your fabric wisely.

After I have measured and cut the foam, I learned to just put the foam on fabric and outline it. To cut the outline, no seam allowances. This is so different than what a typical seamstress might do, because you always cut with seam allowances, but when working with foam you have to compress it, thus forget any seam allowances. And make sure you know which is top and bottom, especially when there is curves or unevenness, if it is a square then top and bottom doesn't matter. This picture is outlining the top plate (top or bottom piece of fabric, they call this a plate) and the other pictures show another fabric where I used my pencil to outline the foam for plate and the measured the long panels.


  I also measured around the foam for the paneling (the fabric that goes around the cushion, part has a zipper) and I did cut 5 inches in width for 4 inch foam, just habit for me, but next time I will probably cut just 4 inches to make the cushions tighter as mine came out a little wrinkly.


There are two pieces of paneling, one for zipper and one for remainder to go around cushion. I measured the zipper piece first length wise so that the zipper would be at the bottom of the cushion, and 2 inches up on each side, I did give myself extra 1-2 inches just so the panel with zipper was long enough to go down each side. The panel without zipper I measured around foam 2 inches up from one side all the way around to the other side 2 inches from that bottom, and give yourself an extra 1-2 inches, seems like on some cushions I ended up about an inch short for some reason and had to add extra fabric.


After everything was cut, I sewed the zipper panel in preparations to make the zipper. I just folded that piece in half length wise and sewed a loose stitch, because you will sew zipper on this and have to rip that seam. I'll post in Part III how to make zipper and finish the cushion.


Thursday, August 22, 2013

Camping Trip, Time Away

Sometimes living in the marina I get the fever. It's like cabin fever, so I call it marina fever.

Hubby says I'm restless, and I guess at times I am.  However, the other live aboards talked about their need to get away, and some have left for a month or months then return refreshed. I wonder if it is the constant coming and going of your neighbors, or the same beautiful view every day you get spoiled with. Not quite sure why I get this marina fever, it could also be the space we live in is quite small and with a rambunctious three year old tight quarters is constraining. Anyhow, whatever the reason I explained to hubby that I need a break from the boat/marina, so we went on a camping trip to Mt. St. Helens.

We enjoyed a camp fire the first night, and paid $23 per night to the state so we can sleep on dirt. The second day we visited the volcano on federal lands, and learned there are many restrictions, warnings with possible fines, and fees. We viewed it and promptly left. As we returned to the campsite we were hit with a ban on campfires, ugh. We got a little perturbed with this state campground and their quick burn ban, but we had already paid for our second night, so we took off for a drive. 

Our drive brought us to the Columbia river, almost where it dumps into the Pacific. I have to say this part of the river was beautiful, there are years of history along that river. Unfortunately, other parts of the river were quite depressing, it was littered with industry. If the day had not reached its end, we may have made it to the mouth of this giant river, but night was quickly approaching and we turned back to our overpriced campsite.

Overall, the trip was a learning experience about ourselves and how much we like our space away from bureaucracy. 


Our campsite.


A big volcano.